Implement Create New Bike Feature
In this step of the tutorial, we will implement the support for our first feature: create (or register) a new bike in our system.
Design considerations
Before jumping over the keyboard to start writing code, let’s first introduce the big picture of the design of our system so that we are prepared to split and scale it out later.
Although we will work on our rental module, we want to build it as a modular monolith. To achieve that goal, we need to keep a few design goals in mind:
-
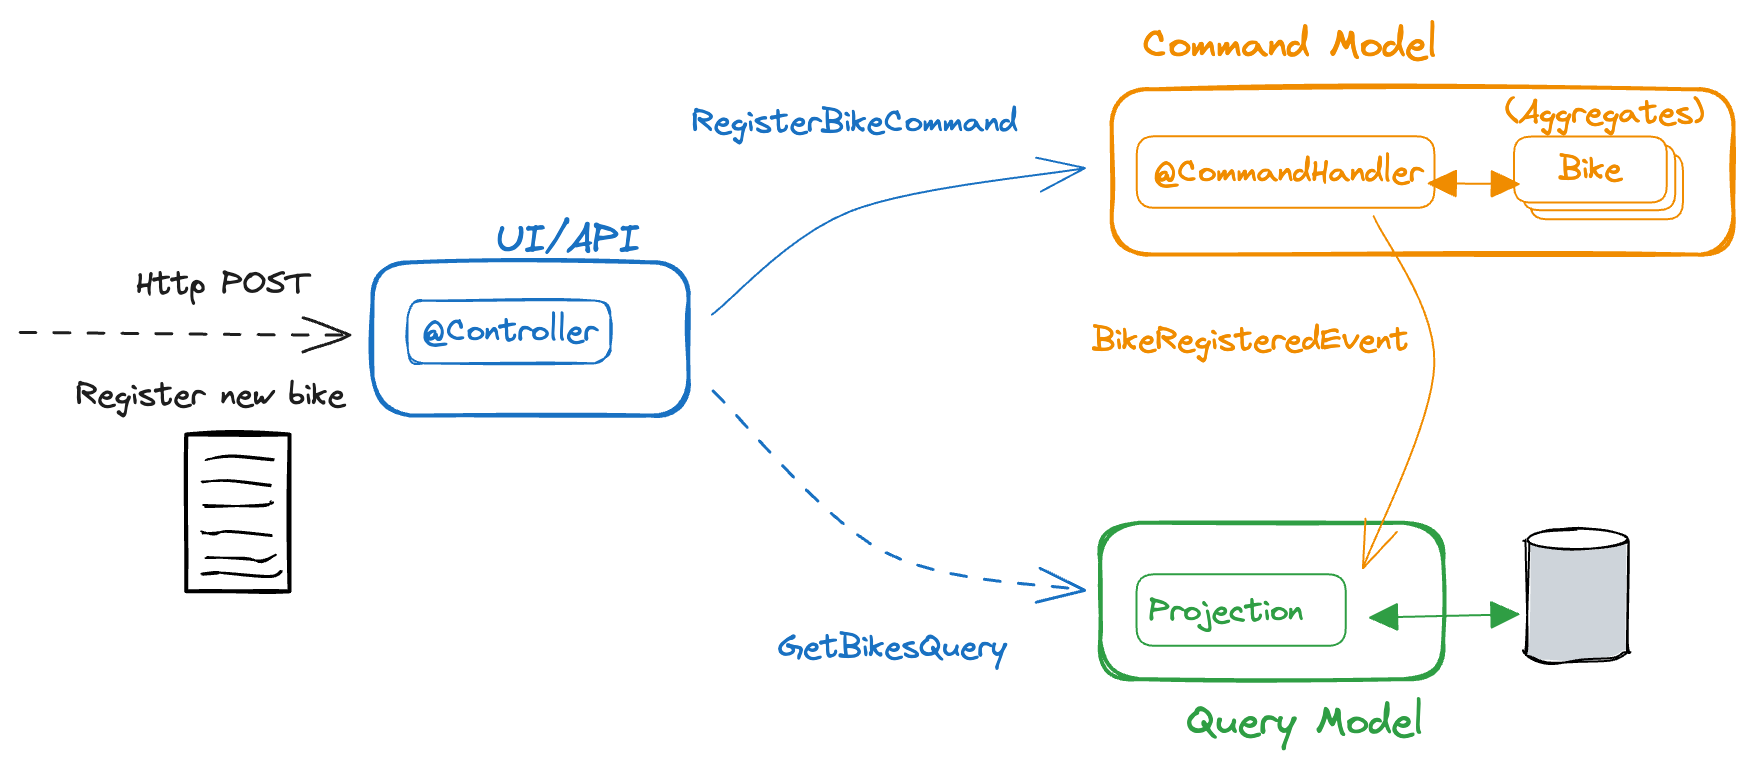
Logical modules based on component’s responsibility: We will group them according to their responsibility in our system. We are going to identify the following logical modules:
-
UI/API: Components that receive requests directly from the user or external applications. We will implement our application’s interface to users or other applications using a REST API.
-
Command Model: These are the components that receive all the requests that, as a result of processing them, imply a change in the state of our system. Requests like "Register a new bike", "Rent a bike" or "Return a bike" are a few examples of Commands
-
Query Model (also known as Projections): Composed of components that will handle the requests for information (or queries). In order to reply as fast as possible, these components will keep the data from our system structured as close as possible to how the user expects the information in the response. For example, imagine that our application needs to support requests to get a complete list of all the bikes and their availability status. In that case, a component (a Projection) will keep the list of all the bikes with their state up to date and ready to be sent back when requested.
-
-
Components loosely coupled: we will use messages (like Commands, Events or Queries) to communicate the different logical modules.
-
Location transparency: we want to rely on abstractions that allow our components not to have to deal with the specific details of how to reach other components to deliver a message. For example, the UI (whose responsibility is to receive HTTP requests and forward the right message to the appropriate handler, either in the Command Model or in the Query Model) should not have to know which is the specific component that will handle and process the request.
These design goals may seem complicated to achieve. Still, if we rely on the correct type of messages and thanks to AxonIQ tools, you will see it is much easier to achieve.
In summary, our rental application will have the following high-level architecture diagram for handling requests to register a new bike in our system (and, generally, to handle all types of requests.)
These could be separate modules, but for now, we are going to consider these just as logical components within the same project: We will define different packages in the same project (in our case, the rental module)
Implementing the process to register a new bike in the system
When the application receives a request to create a bike, that implies that the state of our application will change because, after successfully processing it, we will have a new bike in our system (so, the list of available bikes -our application’s state- will have changed). So, we will model our request as a Command; in our case, we will call it RegisterBikeCommand.
So, the RegisterBikeCommand will be routed to the Command Model, where we will implement a handler method to process it. That method must create the new Bike in our system and notify that "a new bike has been registered" to other components interested in this change.
The type of this message, a notification that something has happened, corresponds to what we define as an Event. Thus, the command handler will trigger a BikeRegisteredEvent.
One last but important thing to remember in our design is the order in which we will implement the code that creates the new bike in our system and the code that fires the event that notifies the change.
In our application, we want to follow the design goals of Event Sourcing, and that implies that the changes in our command model will be done as a result of processing the same BikeRegisteredEvent just as any other component in our application will do. That means that, among other good reasons, the list of Events will become our system’s single source of truth.
The steps for implementing the command handling for the RegisterBikeCommand will be:
-
Receive and validate the command in the
@CommandHandler. -
If valid, send a
BikeRegisteredEventfrom the@CommandHandler. -
Register and receive the
BikeRegisteredEventusing an@EventSourcingHandlerin our Command model. -
Create the bike and assign the details for the bike created in the
@EventSourcingHandlerof our command model.
In the following sections, let’s see how to implement each of these steps in detail.
Defining the command
As we aim to keep the modules loosely coupled so that we can easily split the modular monolith into different projects if we reach in the future the point in which the application has grown too complex that it needs to scale to multiple simpler modules, it’s a good idea to keep the definition of the messages that we are going to use to communicate those logical modules in the core-api module we created earlier.
So, we will create a new CreateBikeCommand in the core-api module. Create a new package io.axoniq.demo.bikerental.coreapi.rental and, inside that package, create the following RegisterBikeCommand:
package io.axoniq.demo.bikerental.coreapi.rental;

import org.axonframework.modelling.command.TargetAggregateIdentifier;

public record RegisterBikeCommand(@TargetAggregateIdentifier String bikeId, (1)
                                  String bikeType,
                                  String location) {
}| 1 | The @TargetAggregateIdentifier indicates to AxonFramework to use the bikeId attribute as the unique identifier to load the Bike with id {bikeId} before handling the command. |
We have defined the command as a Java record that contains the minimum amount of information necessary to process the command.
| Using a Java record structure also brings the benefit of immutability to our command. You can also use a data class in Kotlin to define the commands. |
Implementing the command model
The next step to process the RegisterBikeCommand is to define the component responsible for processing that request. In our example, we are following the DDD design model, which relies on the concept of the Aggregate to model the state of our system. And, with the Axon Framework, we will use the Aggregate to "designate" (via annotations) the methods the framework should invoke upon receiving a specific message.
Creating the aggregate class (the Bike)
Thus, we will start by creating the Aggregate (or Entity) that will represent the state of our application related to the feature of processing requests to register, rent or return a bike.
| In more complex systems, there are some techniques to design your command and query models based on a previous analysis of the interactions and features that the system will support. Event Storming and Event Modeling are valuable techniques to analyze your system and extract the different Commands, Events, Queries and Aggregates. |
We can start by creating a Bike class to model our Aggregate.
@Aggregate (1)
public class Bike {

    @AggregateIdentifier (2)
    private String bikeId;

    private boolean isAvailable;
    private String reservedBy;
    private boolean reservationConfirmed;

    public Bike() { (3)
    }


}| 1 | We will mark the class with org.axonframework.spring.stereotype.Aggregate annotation. This way Axon Framework will handle the lifecycle of the instances of our Bikes based on the Commands and Events received by our command model component. |
| 2 | We will design the attribute that will hold the unique identifier of our bike instance using the org.axonframework.modeling.command.AggregateIdentifier annotation. |
| 3 | We also need a default Java constructor that Axon Framework needs to create the new instance of a bike before populating its fields with the state and invoking the method to handle the Command or Event received. |
Defining the command handler method.
To process a RegisterBikeCommand in our application, we must define a method in our Bike class that receives the command as an argument. To indicate that the method should be invoked upon receiving a command, we will add the @CommandHandler annotation provided by AxonFramework.
In this case, as the RegisterBikeCommand is the request to create a new instance of a Bike, we must define the command handler using a constructor.
@Aggregate
public class Bike {


    @CommandHandler (1)
    public Bike(RegisterBikeCommand command) { (2)
        apply(new BikeRegisteredEvent(command.bikeId(), command.bikeType(), command.location())); (3)
    }

}| 1 | The org.axonframework.commandhandling.CommandHandler annotation instructs Axon Framework to call this method upon receiving commands. |
| 2 | The type of the argument indicates to Axon Framework which type of commands should be linked to the invocation of this method. |
| 3 | The static method AggregateLifecycle.apply() is invoked to send the Event that notifies the change in the state of our system. In this case, to notify that the bike has been registered. |
|
In the command handler, we have not changed the internal properties of the As a general rule and as we discussed in the Command Handler design considerations, we will simply:
We will leave the task of setting the properties of our newly registered |
Handling the BikeRegisteredEvent in the aggregate
We want to design our system following the principles of Event Sourcing, which implies we will use the set of Events as the single source of truth for building or refreshing the state of any component in our system.
That means that we will also use the BikeRegisteredEvent as the source to trigger the state change in our command model, or, more specifically, in this case, in our Bike aggregate.
To be able to react to the event in our Bike aggregate, we need to add a method that receives the BikeRegisteredEvent event as an argument and annotate that method with @EventSourcingHandler:
@Aggregate
public class Bike {


    @EventSourcingHandler (1)
    protected void handle(BikeRegisteredEvent event) { (2)
        this.bikeId = event.bikeId();
        this.isAvailable = true;
    }

}| 1 | The EventSourcingHandler annotation indicates to Axon Framework to link this method to the reception of an event. |
| 2 | Axon Framework will use the type of the argument to link this method to the specific type of event. |
In the implementation of the method, we will finally set the bike properties (the state of our model) with the information provided by the event.
The EventSourcingHandler will be called right after the event publication by the CommandHandler. But it also will be invoked in the future, for the same event, when the system receives another command for the same bikeId (identified because the command has the same @AggregateIdentifier) and Axon Framework needs to regenerate the current state of the Bike instance, by replaying all previous events with the same bikeId.
|
In the EventSourcingHandler method, we should never validate or ignore the changes represented by the event received. The reception of the event and the invocation of the method imply that the command has already been processed previously. So we can’t ignore or reject those changes because they already happened
|
With this step, we have completed the code to process a Command that represents the request to register a new bike in our system.
Implementing the HTTP REST controller
In this section, we will implement the UI layer for our system. The UI layer represents the interface our system offers to the outside world to interact with our application.
In our example, we will start with a REST service interface that offers some endpoints so that a third-party application can invoke our system. This REST interface is convenient for our example because we can show you how to accept requests from the user or another system and create and send the corresponding Command internally.
Create the SpringBoot controller.
For the controller, we are going to create a simple Spring @RestController, and we will configure a couple of components provided by AxonFramework:
-
CommandGateway: is the abstraction mechanism provided by AxonFramework to send commands to the handler and removes from the controller any need to know all the specifics about the number and location of command handlers registered in our system or how to reach them. -
QueryGateway: is a similar abstraction to theCommandGatewayprovided by Axon Framework, but in this case, it is intended to deliver query requests and wait for the query response.
|
Although we will only use the If you prefer to implement your code more progressively, just add the |
The abstraction these two components provide helps keep our @RestController decoupled from the different query and command handlers in our system. Axon Framework will inject the proper implementation to handle the routing and communication patterns required both for queries and commands.
Thus, our controller does not need to keep track of any detail about any of the handlers. This property is known as Location Transparency and it’s one of the features that enable our application to scale out later easily because we can move the command handler implementation to a different module and deploy it in a different machine without the need to touch the code that sends the commands.
We will place our controller in the io.axoniq.demo.bikerental.rental.ui package. Create a RentalController java class with the following contents:
@RestController      (1)
@RequestMapping("/") (2)
public class RentalController {

    private final CommandGateway commandGateway;    (3)
    private final QueryGateway queryGateway;        (4)

    private final BikeRentalDataGenerator bikeRentalDataGenerator;

    public RentalController(CommandGateway commandGateway, QueryGateway queryGateway, BikeRentalDataGenerator bikeRentalDataGenerator) { (5)
        this.commandGateway = commandGateway;
        this.queryGateway = queryGateway;
        this.bikeRentalDataGenerator = bikeRentalDataGenerator;
    }

}| 1 | The @RestController SpringBoot annotation indicates that this component will define the REST endpoints. |
| 2 | The @RequestMapping SpringBoot annotation indicates the root path for all the endpoints that this controller handles. |
| 3 | The CommandGateway that we will use to send the commands. |
| 4 | The QueryGateway that we will use later to send query requests and wait for the response. |
| 5 | We will define a constructor that receives both the CommandGateway and QueryGateway as an argument. Spring will provide the right implementation based on the components defined by Axon Framework. |
Implement the endpoint to register a bike
We must add a method in our controller to handle the HTTP Request to register a new bike. In our system, to create a new bike, we require the request to provide the type of the bike and the location where the bike is registered.
For this endpoint, we will consider the following request format:
POST /bikes?bikeType={bikeType}&location={city}
| When designing a REST endpoint that registers a new element in our system, it is usual to model the API to use a POST request, which contains the information of the entity to create in the body. In this first example, for the sake of simplicity, we will receive the bike details as parameters on the request. |
To implement the endpoint that handles these requests, add the following method to the RentalController:
@PostMapping("/bikes") (1)
public CompletableFuture<String> registerBike(
        @RequestParam("bikeType") String bikeType,      (2)
        @RequestParam("location") String location) {    (3)

    RegisterBikeCommand registerBikeCommand =
            new RegisterBikeCommand(                (4)
                    UUID.randomUUID().toString(),   (5)
                    bikeType,
                    location);

    CompletableFuture<String> commandResult =
            commandGateway.send(registerBikeCommand); (6)

    return commandResult; (7)
}| 1 | The @PostMapping links the execution of this method to the reception of POST /bike requests. |
| 2 | The bikeType argument is extracted from the parameter with the same name on the request. |
| 3 | The location argument is filled with the value of the parameter with the same name from the request’s URL. |
| 4 | We must create the RegisterBikeCommand that represents the command we will send to the command handler in the command model. |
| 5 | The command requires a unique ID for the bike. As this request represents the creation of the new bike, we have chosen to create a unique ID on the controller. |
| 6 | We send the command through the CommandGateway abstraction provided by Axon Framework. |
| 7 | The command will be dispatched to the command handler. It will return a CompletableFuture with the result of executing the command. |
| By default, Axon Framework returns the ID of the bike that has been created. If there is any error in delivering the command to a command handler (for example, because there is no command handler registered for `RegisterBikeCommand`s), the CompletableFuture will contain the error. |
Conclusion
In this section, we have implemented the code necessary to handle requests to register a new bike in our system.
The following image represents the design of what we have implemented.

We can execute our application and see it in action. In our next section, we will go through the steps to run our AxonFramework application together using docker from your development environment.